Wednesday, April 27, 2011

Gorgeous one of a kind red cabinet

This piece of furniture began in my head. After scouring antique stores and decorating books and searching extensively on craigslist and through used furniture stores, I finally found my little piece of heaven. This one is staying home, but I am putting a similar finish on another piece at the moment since I love the way this one turned out and will be putting it in my new booth at A & J's Antiques this weekend. I found the hutch at a used furniture store for $45.00. I had it sitting in the garage for a couple of months before I found the small buffet it sits on perfectly. I found the little solid maple two drawer buffet for $125 on craigslist. The lady wouldn't budge on the price but I knew the measurements were right for my needs so I took it! Here is the story...

The hutch had a wobbly masonite back with woodgrain sticky paper on it. The maple buffet had this little lip around it that I knew would have to be removed.
We took the back off of the hutch and added beaded board paneling from Home Depot that we custom cut. We didn't put it underneath the cabinet we used regular masonite for that.

This is how the cabinet fit on the buffet after we took that wooden "lip" that ran around the edges off. It was really easy for my husband to do. He found the screw holes and worked the screws loose then hammered it off where it was glued. I sanded it down smooth. You can still see the light unstained wood where the lip was coming out in front of the hutch. No worries. I was going to paint it anyway.

Painted the beaded board paneling raw umber and the cabinet Tuscan Red by Americana paint. The right side of the cabinet shows my first sanding with 3X to add distress.

I custom mixed a dark grey paint and then dry brushed it on. This piece has 4 "layers" of paint on it and I didn't photograph each one but here is how I did it. Base in Tuscan Red, dry brushed custom mixed dark grey, then black in a hatching pattern on top of grey. Last coat before the polycrylic was a thick wash of raw umber "stain." I just continued adding and covering up paint until I achieved the patina that I was looking for.

It looks like it ended up a sort of burgandy in this photo, but it didn't. I think it may be because I took the photo without natural light in the evening. I'll try to remember to re-post a daylight photo. It is really a gorgeous red with grey and black touches and then a light distress.

This is a closer look at the distress and paint technique. You can see the black "hatching" pattern. When you do this, you run the paint at the corners in both corner directions up and down and across. That way you get a heavier set on the paint and it ends up looking more authentic.
Another look at the paint technique. It's messy and scattered and that is how I wanted it. Now I can show the before and after and then have fun finding some awesome thrift store goodies to fill it with!!
Before
After
If I were to sell this in my booth, the price tag would easily be $795.00 Remember that I did pay more for the buffet than I wanted but the hutch is fairly hard to find and the fact that they fit perfectly as one piece is pretty cool. Total spent with paint...$180...XOXO...the thrift addict.

Sunday, April 24, 2011

A bit of Easter Joy...

Every Easter we sort of shake things up at our house. We never know what the weather is going to be like so those sunrise services don't always work out for us. Last night we had dinner and played our two favorite family games...Mad Gab and Guesstures. We had the fire going believe it or not in late April and all three dogs were also involved. Great fun. The day was spent thrifting for my Easter table. I know...not as prepared as I should have been but the baskets were already done and the food bought so I did have time. It was great because everyone was having their 50% off sale. Here is what I ended up with. I was going for a vintage Easter look. I'll tell you how much I spent at the end.
It all started when I found this beautiful vintage lace hand embroidered round doily. I love the pink, blues and purple color along with the spring green leaves. It reminded me of my Grandmother. I used to sit and embroider with her for what seemed like hours on pillowcases and handkerchiefs when I was a little girl. I know it wasn't hours because I am all too familiar with my attention span but for that time, I was in heaven. I loved every minute of it.
Here is a place setting. I found the wonderful rosey pink placemats for $4.99 for 6 of them. With Hillary and Chris not being able to join us this year, there are only 6 of us, so it worked. The vintage white plates I found for 50 cents each and there were exactly 6. I will continue looking on my treasure hunts to add to that collection. I love them.  They are not stark white but a little creamier. I mixed them with the salad plates and mugs that I already had. I also already owned the chargers. They are from Pier1 and I have had them for about 8 years. The glasses were a find from A & J's. $12.00 for a set of 4. Since I didn't have enough, I only used three of them and then added 3 other green vintage looking glasses I already had.

I already had the green napkins and they matched perfectly with the green in the doily. I found 6 blue napkins for $3.99 and already had the cute clear beaded napkin rings. Here is a look at those cool blue and green glasses too.


Here is a look at the centerpiece. I stacked a wreath with a beautiful robin's nest on top, added my favorite little bird salt and pepper shakers, a bronze bunny and a couple of vintage looking candles. Voile!!! Centerpiece. Remember that when you are creating a vintage look, to use things that are already available in your home. I snagged these items from lots of different places in my house and will return them as soon as we clean up after dinner!

Another look at the centerpiece so you can see the robin's nest. I love birds and this is definitely birds and bunnies time.

The finished table. I want to add in that this is a hand carved and distressed Italian hardwood table that I purchased from craigslist for $395. The original owner had the receipt that reflected her original purchase amount. It was $4785.00!!!! It was sort of a distress sale and she was so happy for it to go to a great home. I found the chairs at one of my favorite shopping destinations, Simply Beautiful on Link lane in Fort Collins. Edie, the owner, is so sweet and she has amazing taste in what she offers. Her furniture is all gently used and on consignment. I told her what I was looking for, sent her a photo of the table and she called me within a couple of weeks and offered me the chairs. They were originally from Homestead House and the carving on the backs of the chairs is just beautiful. I purchased them for $125 each. We are not sure of the original price, but have seen comparable chairs for about $600-$700 each.

Here is a close up of the carving on the chairs. They all look brand new. I can't believe how well they match my table.

Our Easter Table for 6. On the menu...London Broil with asparagus, twice baked potatoes, salad, deviled eggs and croissants. Lots of desserts and starters as well. Salmon with borsein cheese and crackers, fresh boiled shrimp, veggies, and fruit tray served with chocolate eclaires.
I spent less than $30 for all of the new items for the table for the centerpiece, dishes, glasses, placemats and napkins. I did have many of my items used already, but sometimes that is the key to thrift. Adding on to elements you already own.   Happy Easter and Happy Thrifting! XOXO the thrift addict.

Friday, April 22, 2011

From country to old world charm

Don't hate me because I found this amazing deal. They are out there! You just have to be diligent in your search for the perfect item. I was looking for a larger piece to work on for my book project and came across this oversized armoire on craigslist. It was listed as a divorce sale for $100. Well worth the drive to Denver. When I arrived at the house for pick up, I was pleasantly surprised to see it's scale. Well over 6 feet tall and a generous four feet wide, this armoire was sturdy, solid wood and just waiting for a new personality. At first, I purchased it to re-purpose and sell at A & J's but just after finishing it, decided it was definitely a Grant piece and traded my smaller version in my bedroom for this upscale piece. I am going to re-do my smaller piece and put it in my booth instead. Here is the step by step. This is a complicated process using layers of paint with different techniques so I will try to be as thorough as possible. It is layered in two shades of green, black, butter yellow and raw umber stain and dry brush. The results are worth the effort. Total project time for me was three hours but I am a seasoned painter. I would block off twice that if you are just starting out. Between the hesitation to put more or less paint on to the dry brush being too wet or the stain too drippy, it may take you longer. Be patient with yourself. YOU CAN DO IT!
Before...I had already decided on green and taken two drawers out!

..
First step, base the entire piece in Americana furniture paint in sage green. Add Glidden butter yellow accents to corners and in random areas on the cabinet.

View of the random butter yellow accents on the side of the cabinet. Always follow the grain of the wood when adding accent paint.

Third step was to add random moss green accent layers. I concentrated on the edges of the cabinet doors and drawers and corners. This is to give the cabinet some depth. I used a brush just dipped in the paint but not deeply dipped only on the edge of the bristles. This is close to a dry brush technique but you don't dab the excess paint off on a towel, you just dip the edge of the brush lightly in paint and apply it immediately.
DON'T BE AFRAID!!! The next step is to add a dry brush layer of black paint. Black is a neutral so when used correctly, it unifies the other colors. I used a dry brush technique to "antique" the edges, corners and recessed paneling lines. I always follow the natural direction of the woodgrain. Here's how it looks.
This photo shows the difference between the top and bottom drawers being antiqued with the black and the middle drawer not done yet. You can see the depth of character that the black paint adds.
At this point, the paint should be randomly brushed on and the cabinet sort of look like a big mess of colors. That is what it is supposed to look like. You will pull this weathered look together with a raw umber stain.
Look at the difference between the top and bottom of the side of the cabinet. The top has been stained with a water and raw umber mixture and brushed on from top to bottom in one direction. I let it sit for about three minutes and then take a dry towel and lightly rub off.
Continue to stain entire cabinet. It's ok if the stain sort of develops "run" marks. It all adds to the character of the piece. This is the finished product so far. I am going to allow it to "sit" in the garage this morning and then decide whether or not I want to sand it down and distress it. If I do, I will sand down to the raw wood and since it is pine, I will go back and dry brush directly over the sanded parts with raw umber to give the impression that it was once dark underneath.
This is what all of those layers of paint and hard work look like when you are done!
Let's do a before and after look again!

BEFORE...COUNTRY
AFTER...OLD WORLD CHARMING!
Remember that this armoire was on craigslist for $100! After about $35 in gas and less than $10 in paint, I would retail this cabinet for about $600. That's a nice profit for all of my hard work. I am definitely going to keep it though. Happy Easter and Happy Thrifting!!! XOXO the thrift addict.

Thursday, April 21, 2011

Easter Baskets Refurbished!!!

My children are a huge part of my life. All I ever wanted was a house full of children and my husband of 29 years and I have been blessed with just that. We have three girls and two boys. Our life has been full of light and love and blessings since we first layed eyes on our now 26 year old Taylor. Hillary is married and soon to be 23 in May and Ashton will be 20 in June. We also have two boys Tristan who is 15 and Kieran who just earned the rite of teenager (13) in November. We have moved a dozen times (actually more) but it's a long story and over the years, the kid's Easter baskets have gotten really trashed. I custom made my girls' Easter baskets when they were just babies. Each one matched their nursery. When the boys came along, I just used plain baskets. This year I decided to refurbish those little baskets and am going to allow the girls to take them after Easter Sunday and keep them for themselves. Maybe this will encourage us to all be together on Easter. (How am I going to fill them up if they aren't here...I know...sneaky.) I am not giving a step by step of these because just finding the time to do them was a challenge, but I wanted to share the after. They are super cute. I already filled Hillary's and sent it so that it would arrive in NC by Easter.
Each of these baskets reflects the character of the girls. I recreated them in the same color scheme as their nursery. I can't believe how true to their personalities they are even today.
This is Taylor's. Her nursery was in peach and pastels. I added the branch element to update it for a more contemporary adult look. The small white hydrangeas elicit a certain element of elegance. This is my Taylor. Always prepared, always in control, always classy.


This is Hillary's basket. She had a nursery with pastel colors as well. She carried her blankie around with her for 7 years or longer until we had to put it away reserving it for sleepovers and dance conventions. She had me sew a heart patch from her blankie into her wedding dress for her something old. So sweet. I'll never forget it.


This is Ashton's basket. Her nursery was in brighter colors and the flowers match her bright personality. I added the butterfly because like Ashton, the butterfly emerges and changes and doesn't feel boundaries. I love that about Ashton and this basket really reflects her personality.


I am proud of myself for finding the time to refurbish these baskets. It has been a goal of mine for several years now. Finally it's done...happy thrifting and happy Easter! XOXO the thrift addict.

Monday, April 18, 2011

Weekend projects...All About A & J Antique Mall!

Busy weekend! It seemed to be all about A & J Antique Mall, so I am going to just quickly go through a couple of projects that kept me hoppin' this weekend. First, I have a dealer friend at the mall that has a great eye for furniture items but she doesn't paint... : ( . So we were talking the other day in the mall and she showed me these two great corner cabinets that she has had for sale for quite some time. They are good and solid and very unique in that they have beautiful nine pane glass fronts and storage cabinets on the bottom. Great bones. I painted one of them black with a medium distressed finish and then a polycrylic overcoat for some sheen. One I left natural and Taylor decided she wanted it. Of course I am going to paint it! She hasn't decided what color yet but it will be an Easter weekend project, so I'll show you later. The other project was a china hutch that I bought from another dealer. It was beautiful in stature and had great dental molding and cabinetry but it was just painted white with a thick finish. It was really wanting to become more stylized so I got out some 3X sandpaper and went to work! Here is how it went.
BEFORE
AFTER
A close up of the medium distress. This is after two coats of black flat paint, Then 3X distress and a coat of polycrylic. All Home Depot products and latex based. Little drying time.
Back at A & J's next to it's unpainted brother that Taylor purchased.

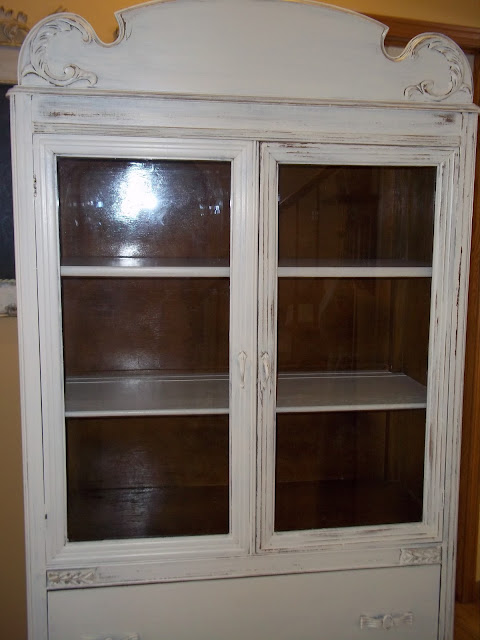
The next project was the china hutch. I love this. I have it priced fairly high because I want to bring it home myself. If it sells, it will be bittersweet, because of it's one of a kind nature, but I will live. I have parted with some absolutely wonderful things in the past. Part of the business that takes getting used to. I really wish you could have seen the before but I was just a little too busy to remember to take a photo...so sorry because the distressing is what brought this piece to life!

This is the AFTER

One more thing that was on my agenda was a staff meeting at Pier 1 Imports. I work there because I love the people. The managers are wonderful and have become such dear people in my life and the other associates are amazing. I also receive a 25% discount on all of my purchases. It is a wonderful place to work and although it is difficult to fit it into my busy life, I can't seem to let it go. I love Pier 1. Here is a place setting we had to put together as a project. This is my version of Easter Brunch place setting.
So cute! Not only is working at Pier1 fun and I get such a generous discount on all of my personal purchases, but it also keeps me up to date with the newest home fashions and styles. It helps me offer things in my booth that I know people are looking for. What a great place to work. In addition to a busy weekend working, I also cleaned the garage, restored my daughters' easter baskets and sewed some vintage pillows. I'll show you some photos tomorrow. Until then...happy thrifting! XOXO the thrift addict

Thursday, April 14, 2011

FABULOUS SHABBY CHIC ANTIQUE!

Okay...I know I already posted today but I just had to show you this fabulous antique that I painted for my booth at A & J's. I found it in Denver for a song. It was missing a shelf but other than that, it was in perfect condition!! The carving was beautiful and I had a plan....PAINT IT!! I know some of you are cringing, but decorating is an artform. It is the expression of what human beings find beautiful and my version of this piece at it's best was being painted. It screamed for it!! When I brought it home I realized that it smelled quite a bit like smoke, so I dipped a rag in 1/2 vinegar and 1/2 water and saturated all surfaces and let dry. Then I repeated it twice more. Works like a charm. Here is the before piece...
Bear with me on the photos of this piece. I wanted to show all of the detailing and the photos don't even do it justice.
Basically I put two messy coats of off white Behr paint and primer in one. I picked it up off of the oops rack at Home Depot. Got a quart for $1.00.
Wanted to show you how well that just the first coat covers. It is a great product. This is in a satin finish.

First coat. Look at the detailing already coming out on this piece. I love it! When you are painting an antique, you really just have to jump in! You can't hesitate and overthink it. I gave this piece new life...just watch.

This was with the second coat. I left it messy. I wanted it to have some character. I didn't want it perfect like factory. Older paints performed differently than today's products and I wanted it to look like it came from my Grandmother's house.

This is the corner detailing with the second coat applied. This is how I left it. This is the messy look I was talking about. You can see brush strokes and some of the wood showing through.

I let it dry about 20 minutes. No kidding. This product is very thick and dries so fast. It was even snowing and wet today. This is what the 3X sanding does for the cabinet. One or two swipes and it takes off a generous amount of the paint.
Here are more photos of the detailing with the sanding done.
More of the detailing as I kept sanding. With every time I use the sandpaper I get more confident on a piece so I always have to go back where I started and take off a little more. This was a medium distress. I focused on corners and detailing.

This is how the detailing ended up after two messy coats of paint and the 3X brand sand paper. I love it!

The difference between the distressed side on the RIGHT and the side not yet distressed (LEFT)

This is the distress on the drawer. Look at the corner. I worked from the edges down and across and then just randomly sanded on the drawer's surface.

More detailing on the legs. I am sorry for all the pics, but it is important that you see it up close. The far away photos just don't do it justice.

More of the detailing. This is just a medium distress, but the piece could have taken a heavier distress. It had enough lines and character. I just wanted to make it more formal. If a piece is too distressed it turns sort of country. You have to be careful and know how much paint you want to remove before you start.

A closer look at the detailing on the finished piece. I didn't put a satin polycrylic over this because it will allow the piece to grow with use. Every nick and scratch will become a part of the character of the piece.
Another look at the piece from a different angle. I painted the back as well and I distressed the legs and sides to match the front.
This is the after shot of the piece after it was completely finished. I put it in my booth at A & J's this afternoon and it sold in 30 minutes. That really is a record! I didn't even set my purse down when I got home before the phone was ringing and it was Susan at the front desk telling me it had sold.  I had trouble parting with it myself because it turned out so beautiful. This is encouragement for those of you who think you don't like antiques. Look at how wonderful this piece looks and it was a full on antique piece. Take courage and paint! You are honoring the piece by allowing it to have a new look and a new life. Here is another look at the before and after.
I got this piece on craigslist, gave it a new life and now a new home. Happy Thrifting! XOXO the thrift addict.